Train a Custom OCR Model with PARSeq (with Code)
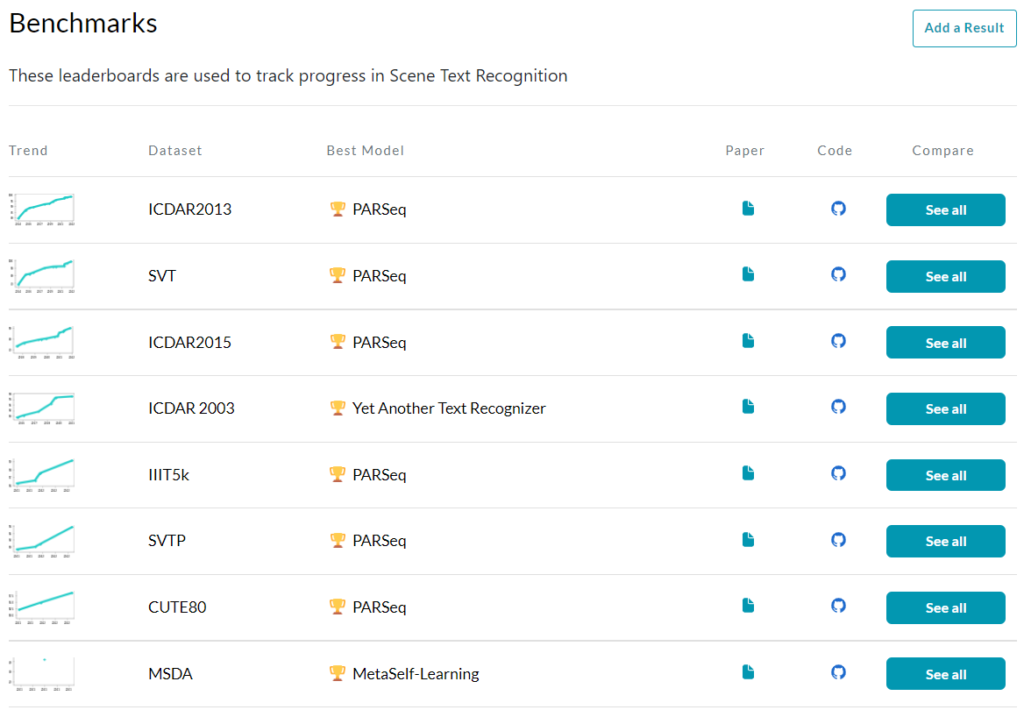 STR Leaderboard in Papers with Code
I was recently going over the Scene Text Recognition benchmark list at Papers With Code. To my surprise, almost the entire benchmark list was taken over by one model: PARSeq. It had the best results in 6 out of the 8 benchmarks.
Accordingly, if you’re stuck at an STR problem (as I was), it might be a good idea to give this model a try. However, in my case, the dataset I was using wasn’t in English, which may be the case for a lot of you, as well. In this blog post, I’ll give you what you need to do in order to get the model running for your use case. If you would like to get an understanding of how the model works, check out this blog post.
- Steps to prepare for training PARSeq
- Things you may have to change
- Train PARSeq
- Run in Colab
- Final Thoughts
Steps to prepare for training PARSeq
1. Clone the repository
You can find the official repository of PARSeq here on GitHub which you can clone using the following command:
git clone https://github.com/baudm/parseq.git
I do also have a fork of the original repo where I’ve made the changes to get it to work for my use case (Sinhala Handwritten Text Recognition). You’d probably have fewer changes to make if you cloned that, but I would recommend going through the steps, just so it would be easier to debug if you run into any issues. The following is the command to clone my fork:
git clone https://github.com/dilithjay/Sinhala-ParSeq.git
2. Create the charset yaml file
Inside the cloned repo, you’ll be able to see a directory called configs. This is where all the configuration-related files will be. Inside the configs directory, you should see a sub-directory called charset. This is where you’ll store the alphabet (all the characters) you’re training for.
Create a new file inside the charset directory with a name in the format <num_characters>_<any_identifier_you_like>.yaml. The format isn’t mandatory, but why not maintain the practices that are already in place? :-)
The content of the file would look something like this:
model:
  charset_train: "abcdefghijklmnopqrstu"
Replace the characters with the characters in the charset_train string with those of your language.
If the characters for your use case are of a different language, you can either replace the string with characters of your language, or you can have a mapping from the available characters to your language.
I had to take the latter route because, in Sinhala OCR, a single character in a string doesn’t always correspond to a single character visually. What I mean by that is that sometimes a combination of multiple characters in a string forms a single entity, visually.
3. Create the dataset
For training the model, we’ll be creating a dataset using the LMDB library. LMDB stands for Lightning Memory-Mapped Database and it’s a highly efficient database that stores in the “key-value” format.
Prerequisites
To create the dataset, the PARSeq repo provides an updated version of a python script that’s generally used for this purpose. Therefore, you can find the script here or inside the tools directory within the repo you cloned.
Before running the script, you will need the following:
- A place to store the
.lmdbfile. One thing to note is that the drive you’re saving to should have sufficient space. If you don’t have about 1TB of free space in your drive. Change the map_size attribute oflmdb.open()from1099511627776to1073741824. - A directory with all the training images. Make sure the names of the images do not have spaces.
- A text file with all the image names and their respective text. So for example, the content of the text file may look something like this:
img_1.jpg hello
img_2.jpg world
img_3.jpg someword
Create the dataset
For ease of explaining, let’s say the output directory is data/output/ (automatically created), the image directory is data/images/, and the name of the text file is gt_file.txt. Simply run the following command (after replacing the 3 paths with your paths):
python tools/create_lmdb_dataset.py data/images/ gt_file.txt data/output
If you’re having issues with paths, use the absolute paths (e.g.: D:/DocumentAI/Sinhala-ParSeq/data/images/) instead of the relative paths. Also, if you need additional help with the script, run the following:
python tools/create_lmdb_dataset.py --help
Set up the hierarchy
Once the script has been executed, your output directory should have been created, and you should find two files inside it: data.lmdb and lock.lmdb. Copy the entire folder and paste it inside data/train/ (you may have to create the train folder inside the data folder). Afterward, give the dataset a name and rename the folder accordingly.
If you have a validation set, do the above steps with it, as well. Copy the generated dataset folder inside data/val/ and rename it with the same dataset name you gave to the training set. Your directory structure inside the data folder should now look something like this (my dataset name is sin_hw):
data/
├─ train/
│  ├─ sin_hw/
│  │  ├─ data.lmdb
│  │  ├─ lock.lmdb
├─ val/
│  ├─ sin_hw/
│  │  ├─ data.lmdb
│  │  ├─ lock.lmdb
4. Create the dataset yaml file
Similar to charset, there’s also a dataset directory inside the configs directory. Accordingly, create a yaml file with the name of your dataset. You can simply duplicate one of the existing files and rename the yaml file’s name and the train_dir attribute to the name of your dataset. The train_dir doesn’t have to be the same name as your dataset, but it’s easier this way. In my case, the name of my dataset is sin_hw, so the content of the sin_hw.yaml file is the following:
data:
  train_dir: sin_hw
  num_workers: 2
Note: I’ve specified num_workers = 2 because that’s what’s recommended for Google Colab. Feel free to change it as needed.
Things you may have to change
There are a few other things that I had to change to make it work for my system and dataset. Decide whether to make those changes based on your situation.
- In
configs/main.yaml- Under the
trainerfield- Set
gpusto the number of GPUs you want to use. - Set
val_check_intervalto something smaller than the number of batches per epoch
- Set
- Under the
modelfield- Set
img_sizeto the dimension you want to use. All images would be resized to this. - Set
batch_sizeto something smaller, depending on your memory availability
- Set
- Under the
- If you’re using the CPU (instead of a GPU), then, on line 75 of
train.py, add the argumentaccelerator='cpu'to thehydra.utils.instantiatemethod.
Train PARSeq
If you managed to setup everything correctly, simply running the following command should start the training process:
python train.py
During training, the checkpoints of the three best models and the last checkpoint are saved inside outputs/parseq/. The way to reload the checkpoint is available inside the notebook file in the next section.
Run in Colab
I’ve prepared a quick GitHub gist for anyone who wants to try this on Colab. It specifically works with my fork of the official PARSeq repository, so feel free to make the necessary changes to get it to work for your case.
Final Thoughts
That’s it! Hope you found this useful and feel free to reach out to me if you run into any issues. Also, if PARSeq didn’t work too well for you, then check out this blog post, which includes links to train a custom model using several other SOTA models. It also includes CDistNet which worked best for my use case.