Train a Custom OCR Model with CDistNet (with Code)
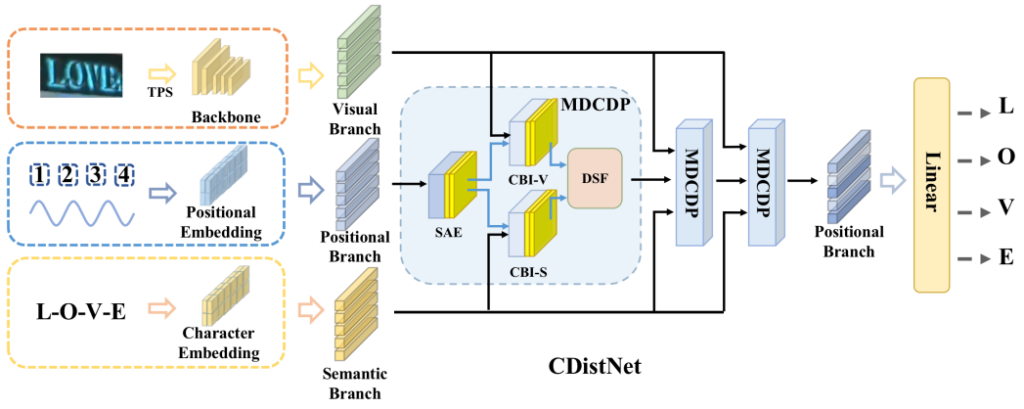 CDistNet Model Architecture
Similar to what I mentioned about PARSeq in my previous blog post, CDistNet, too, is a model that’s been performing very well at Scene Text Recognition (STR). In fact, this model performed better for my use case (Sinhala OCR) than PARSeq. So, it might be a good idea to give this a try if PARSeq didn’t work too well for your use case.
Steps to prepare for training CDistNet
All the changes that I’ve made to get the original repo to work for my use case can be found here. However, you may not need all the changes. So, I’ll discuss each of them below.
1. Clone the CDistNet repository
You can find the official repository of CDistNet here on GitHub and you can clone it using the following command:
git clone https://github.com/simplify23/CDistNet.git
2. Create the dataset
If you, by any chance, already created an LMDB dataset, either during the previous blog post, or otherwise, then you can skip this section. If not, then:
-
Download the create_lmdb_dataset.py file from here
-
Follow Step 3 of the previous blog post. Just the “Prerequisites” and “Create the dataset” sub-steps are enough.
3. Change the character set (optional)
Do this step if the characters you’re training for are different to the default (0-9 + a-z).
-
Inside the cloned repo, visit the path
cdistnet/utils/. -
Duplicate the
dict_36.txtfile and rename it to include the number of characters in your alphabet (instead of 36). -
Replace the characters in their alphabet with those of yours. Leave the first 4 characters as is.
4. Change the config file (CDistNet_config.py)
-
Inside the clone repo open up
configs/CDistNet_config.py. -
Change the
dst_vocabvariable to be the path to the file created in Step 3 -
Change the
dst_vocab_sizevariable to be the number of lines in the file created in Step 3 (total number of characters). -
Replace the paths for
gt_filein thetraindictionary with the path(s) to your training dataset(s) (the folder created in Step 2).
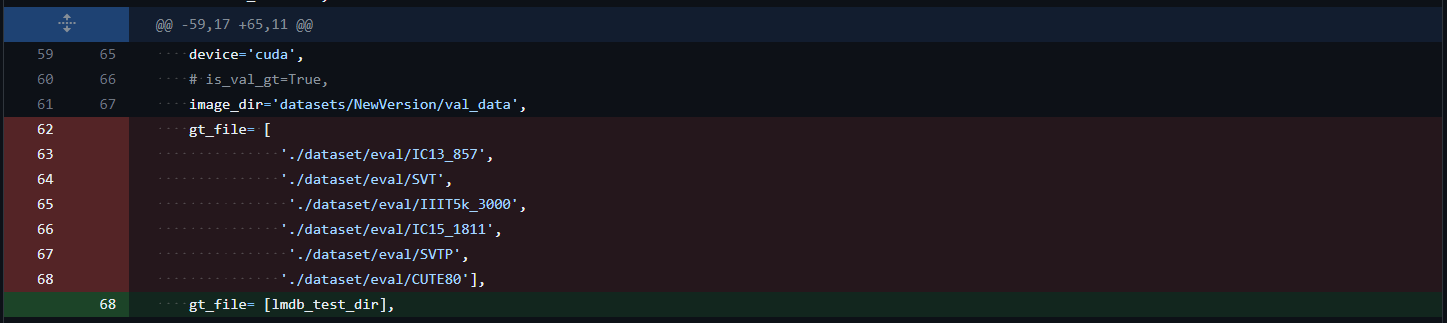 Changes for
 gt_file in CDistNet_config.py
- Do the same for the
valandtestdictionaries.
Optional Changes
-
Set
num_workers=0in thetrain,valandtestdictionaries if its causing errors. -
Reduce
batch_sizeif memory is insufficient. -
I’ve assigned the dataset paths to environment variables so that I can easily change them via a notebook file.
5. Few changes to requirements.txt
My local tests were executed with Python 3.8.9. However, this version of Python did not include torch==1.5.0, so I used a later version (torch==1.8.0). Also, to install the CUDA version, I used the following command:
pip install torch==1.8.0+cu111 torchvision==0.9.0+cu111 torchaudio==0.8.0 -f https://download.pytorch.org/whl/torch_stable.html
You may also have to install lmdb if not already installed. Finally, I had an issue with the automatically installed protobuf version so I added a later version for that as well (protobuf==3.20.2).
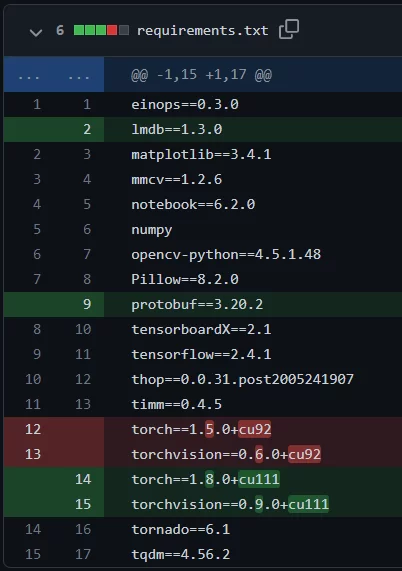 Changes to requirements.txt in CDistNet
6. (For Windows users only) Change the tensorboard logging format
Windows doesn’t allow the usage of colons (:) in their filenames, so make the following change:
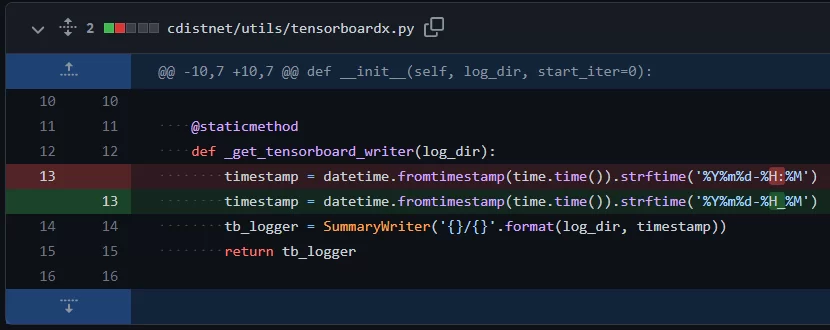 CDistNet tensorboard logging change for Windows
Train CDistNet
If you managed to setup everything correctly, simply running the following command should start the training process:
python train.py --config configs\CDistNet_config.py
During training, the best model at each epoch would be saved to models/reconstruct_CDistNet_3_10/. So, you can change this path from the config file in Step 4, as well.
Run in Colab
To train the model on colab, feel free to use the following notebook. To do so, simply change the path names to the name of your fork of the original repo and you should be good to go.
Final Thoughts
All done! Hope you’ll find this post useful. Also, feel free to ask about any issues you may run into. Finally, if CDistNet didn’t work too well for you, then check out this blog post, which includes links to train a custom model using several other SOTA models.