How to Read MNIST Images in Java
The MNIST dataset is often one of the first datasets that come to mind when training I recently came across a situation where I needed to try training a model on an Android device. I obtained the code for the on-device training from Tensorflow’s blog post. The code worked perfectly fine as it was, but I wanted to see how it would perform if I trained the model with the MNIST dataset. Searching around, I didn’t find any resource that provided how to read the MNIST dataset in Java. So, I figured I’d do it.
Quick Note
The model used by Tensorflow’s example app would need several alterations in order to work with the MNIST dataset. The reasons are as follows:
- The model works with 4 classes, while MNIST works with 10 classes (one per digit).
- The input for the model is of size 224x224 while the images of MNIST are 28x28.
- The existing model likely isn’t pre-trained on a dataset that’s similar to the MNIST dataset (judging by the expected input size).
All these issues do have workarounds, but I won’t be going into that here.
The Code
Here’s the code to get the data from the MNIST website and load the data into a 2-dimensional Float array in Java:
final String trainImagesURL = "http://yann.lecun.com/exdb/mnist/train-images-idx3-ubyte.gz";
final String trainLabelsURL = "http://yann.lecun.com/exdb/mnist/train-labels-idx1-ubyte.gz";

try {
  URL url = new URL(trainImagesURL);
  InputStream stream = url.openConnection().getInputStream();
  InputStream imgIn = new GZIPInputStream(stream);

  url = new URL(trainLabelsURL);
  stream = url.openConnection().getInputStream();
  InputStream lblIn = new GZIPInputStream(stream);

  byte[] tempBuffer = new byte[16];
  imgIn.read(tempBuffer, 0, 16);
  lblIn.read(tempBuffer, 0, 8);

  byte[] dataBuffer = new byte[1];
  String[] labels = new String[60000];
  float[][][] images = new float[60000][28][28];
  for (int i = 0; i < 60000; i++){
    System.out.printf("Iter: %d/60000\n", i + 1);
    lblIn.read(dataBuffer, 0, 1);
    labels[i] = Integer.toString(dataBuffer[0] & 0xFF);

    for (int j = 0; j < 784; j++){
      imgIn.read(dataBuffer, 0, 1);
      float pixelVal = (dataBuffer[0] & 0xFF) / 255.f;
      images[i][j / 28][j % 28] = pixelVal;
    }
  }
} catch (IOException e) {
  e.printStackTrace();
}
Additionally, the implementation uses the following imports:
import java.io.IOException;
import java.io.InputStream;
import java.net.URL;
import java.net.URLConnection;
import java.nio.ByteBuffer;
import java.util.zip.GZIPInputStream;
If that’s what you came for, have fun! :-)
The Explanation
If you would like an explanation, then this section is for you. Let’s go over the code, bit by bit.
Getting the files from the MNIST website
final String trainImagesURL = "http://yann.lecun.com/exdb/mnist/train-images-idx3-ubyte.gz";
final String trainLabelsURL = "http://yann.lecun.com/exdb/mnist/train-labels-idx1-ubyte.gz";
Here, we define the URLs for the training image and labels. You can obtain these from the MNIST Website. Simply right-click on the links and click Copy link address.
For convenience, here are the links for the test images and labels, if needed:
- Test images:
http://yann.lecun.com/exdb/mnist/t10k-images-idx3-ubyte.gz - Test labels:
http://yann.lecun.com/exdb/mnist/t10k-labels-idx1-ubyte.gz
The next step would be to load these files into memory. We use the following lines to get InputStream objects for both the images and the labels. These can be later used to read the bytes one by one.
URL url = new URL(trainImagesURL);
InputStream stream = url.openConnection().getInputStream();
InputStream imgIn = new GZIPInputStream(stream);

url = new URL(trainLabelsURL);
stream = url.openConnection().getInputStream();
InputStream lblIn = new GZIPInputStream(stream);
In the above snippet, we first get a URL object from the trainImagesURL. We use this object to get a connection to the file (.openConnection()). We could then get an InputStream using getInputStream(). However, now we’re reading the bytes from the zip file, whereas what we want is to read the bytes from the uncompressed file. To do this, we pass the input stream through GZIPInputStream and Java takes care of the rest by decompressing it for us.
Getting to the Image data in the .idx-ubyte file
Now that we have a pair of object which we can use to access the data, the next step is to see how we can get the exact data we want. To do this, we use the read method of the InputStream instance we have.
The read method takes 3 arguments.
Arg 1: The byte array to which the data should be copied to.Arg 2: The offset within the destination byte array at which the read bytes should start being stored.Arg 3: The number of bytes to read from the input stream.
byte[] dataBuffer = new byte[16];
imgIn.read(dataBuffer, 0, 16);
lblIn.read(dataBuffer, 0, 8);
If we take a quick visit to the MNIST website, and scroll down to the title saying “FILE FORMATS FOR THE MNIST DATABASE”, we can see how the bytes are arranged in the files we just read.
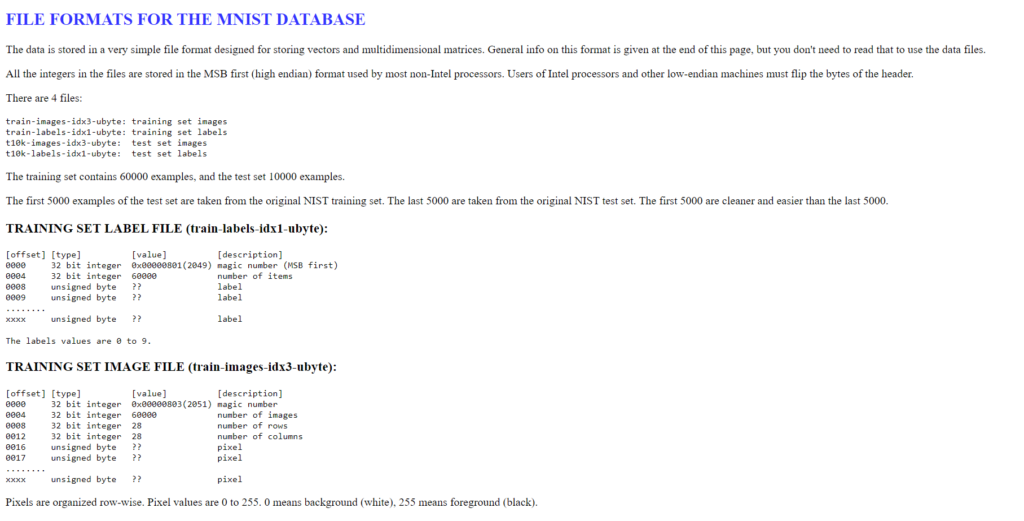 A screenshot of the File Formats page
The beginning of each file just contains metadata about the dataset: the image file starts with 16 bytes of metadata (a magic number, the number of images, the number of rows, and the number of columns — 4 bytes each), while the label file starts with only 8 bytes of metadata (a magic number and the number of labels). However, since we already know the dimensions of the dataset, I’ve chosen to skip those bytes and get right to the actual image data. This is the reason why we read 16 bytes from the beginning of the image file and 8 bytes from the beginning of the label file. Another option would’ve been to skip past those bytes using the skip method of the input streams. Feel free to go with whichever method you prefer.
Reading the Image Data
Now, we come to the for loop.
byte[] dataBuffer = new byte[1];
String[] labels = new String[60000];
float[][][] images = new float[60000][28][28];
for (int i = 0; i < 60000; i++){
  System.out.printf("Iter: %d/60000\n", i + 1);
  lblIn.read(dataBuffer, 0, 1);
  labels[i] = Integer.toString(dataBuffer[0] & 0xFF);

  for (int j = 0; j < 784; j++){
    imgIn.read(dataBuffer, 0, 1);
    float pixelVal = (dataBuffer[0] & 0xFF) / 255.f;
    images[i][j / 28][j % 28] = pixelVal;
  }
}
Initialize arrays
First, we define our byte array called dataBuffer. Its size is 1 since we’ll be using it to read the data from the input streams one byte at a time. We also define the arrays for our labels and images. The MNIST dataset has 60,000 images, each of size 28x28.
Reading the label data
After initializing the buffer, we loop 60,000 times, which is the size of the training dataset, and read the bytes for each image.
Within each iteration, we come to the line lblIn.read(dataBuffer, 0, 1);, which we discussed earlier. However, if you’re unfamiliar with how the read works (as I was), you might be a bit confused about one thing. Why are we using an offset (the second argument) of 0? Shouldn’t we increment this after reading each byte? Well, turnsout the answer is no. The reason is that the offset refers to a position within the destination array (dataBuffer), not within the file — whenever we execute the read method, the stream automatically moves its “cursor” forward within the file. Since our buffer holds just a single byte, the offset should remain as zero.
According to the MNIST website, each label is stored within a single byte of data. So, what we do is, we read it into the dataBuffer, and then convert it to a string. This is done using the line labels[i] = Integer.toString(dataBuffer[0] & 0xFF);. You may have noticed the strange looking & 0xFF in this line. The reason for this is that Java doesn’t support unsigned bytes. So, to get the class we need, we have to perform a bitwise & with our byte. This converts the byte to an integer which carries the respective unsigned byte.
Reading the image data
Next, we loop over the pixels of the image. The 784 comes from the fact that the MNIST images are of size 28 by 28 (28 x 28 = 784). As per the website, the grayscale values of each pixel is stored one after the other within the file. As an example, here’s the order of pixels in the case of a 5 by 5 image:
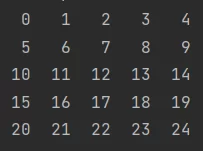 Pixel order for a 5x5 image
We get the pixel value in the same way we got the label value (float pixelVal = (dataBuffer[0] & 0xFF) / 255.f;). We also normalize our pixel values to be between 0 and 1, since it helps model training. Next, we assign that value to the appropriate slot on the image (images[i][j / 28][j % 28] = pixelVal;). Let me clarify why we’re going with these indices.
- The first indexing (
i) denotes the index of the current image within the dataset. - The second indexing (
j / 28) denotes the index of the row of pixels within the image. - The third indexing (
j % 28) denotes the index of each pixel within a row of pixels.
The / sign in Java denotes integer division when dividing two integers (as in this case). The % sign represents the symbol for the remainder (or in another way: j % 28 = j - (j / 28) * 28).
Take a look at the image above and consider each shown index to be denoted by j. You’ll notice that j / 5 is common for all pixels of the same row. Similarly, you’ll notice that j % 5 is common for all pixels of the same column. Therefore, we could use these values to uniquely identify each pixel by their row and column.
Final Remarks
That’s it! Hope this helps. Please feel free to drop a comment below if I’ve missed anything or if I’ve made a mistake on anything. Thanks for reading!